- Outdoor Clothing and Footwear

- All in the category Outdoor Clothing and Footwear
- Footwear

- Jackets

- Military Blouses

- Pants

- Functional clothing

- Sweatshirts

- Shirts

- Hawaiian & Lifestyle Shirts

- T-Shirts

- Shorts and Bermuda

- Overalls

- Caps and head coverings

- Gloves

- Socks

- Belts

- Suspenders

- Scarves, shawls, neckwear

- Raincoats, ponchos

- Women's clothing

- Children's clothing

- Clothing Care and Maintenance

- Patches & Insignia

- Vests

- Camping and hiking

- All in the category Camping and hiking
- Backpacks

- Bags, satchels, suitcases, waist bags

- Sleeping in nature

- Cookers, grills

- Lighting a fire

- Outdoor Dishes and Tableware

- Dining in nature (Food for the journey)

- Survival kit

- Compasses

- Climbing equipment

- Flashlights

- Camping furniture

- Eye-glasses

- Telescopes

- Hydration

- Water purification

- Small Equipment and Essentials for Survival

- Electronics and accessories for mobile phones

- Cases

- Paracords

- Wallets

- Towels

- Solar showers

- Waterproof notebooks

- Mosquito and insect protection

- Foot, hand, and body warmers

- Repair Kits and Adhesive Tapes

- Boating equipment

- Health, protection

- Tactical Gear

- All in the category Tactical Gear
- Plate Carriers and Tactical Accessories

- Load-bearing harnesses

- Tactical vests

- Tactical cases and pockets

- Ballistic protection

- Hearing protection

- Protection

- Tactical and military backpacks

- Tactical and combat belts

- Tactical Eyewear

- Flashlights for soldiers and police

- Helmets, coverage

- Camouflage

- Gas masks and protective equipment

- Medical equipment

- Boxes, cases

- Battering rams, crowbars

- Gear for dogs

- Shooting Supplies

- All in the category Shooting Supplies
- Shooting Glasses

- Weapon bags

- Shooting gloves

- Weapon cases

- Weapon Slings

- Optical sights

- Rangefinders

- Gun flashlights and lasers

- Cleaning, maintenance

- Gun waist bags

- Shooting bags

- Shooting mats

- Boxes and cases for ammunition

- Training equipment for shooting

- Bullet traps

- Speed loaders

- Knives and Tools

- Self-defence

- Firearms and Ammunition

- Other

- By interest

Limb Injuries (Part 3): Immobilization
Fractures, sprains, dislocations, bruises, and torn or strained ligaments – these are all common and unfortunately serious limb injuries, especially when they happen in remote locations where medical help is not immediately available.
In our previous articles on stable and unstable injuries, we discussed why it's not advisable to attempt a precise diagnosis in the field and why it's better to focus on the severity of the injury and the availability of medical care.
If you find yourself in a situation where help won't arrive within minutes – for example, in the mountains or far from civilization – you’ll need to immobilize the injured limb and prepare the person for transport.
In this article, we’ll show you how to create an improvised splint in the field. The next part of the series will focus on transportation itself.
When Limb Immobilization Is Necessary – And When to Skip It
Immobilization is essential in cases of serious limb injuries. These are classified as unstable injuries – meaning the limb cannot bear weight, has restricted movement, or shows signs of impaired nerve function or blood flow.
⛑️ Important Notice
Apply a splint only if emergency medical services are not within reach and you must transport the injured person yourself – for example, in mountainous or remote terrain.
If rescue services are available, call 155 or 112, or use the “Záchranka” emergency app.
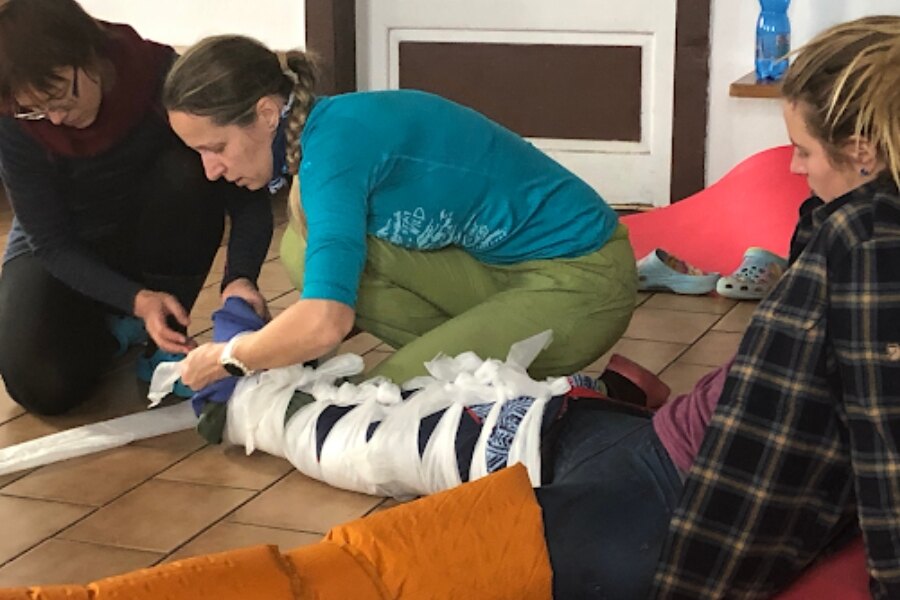
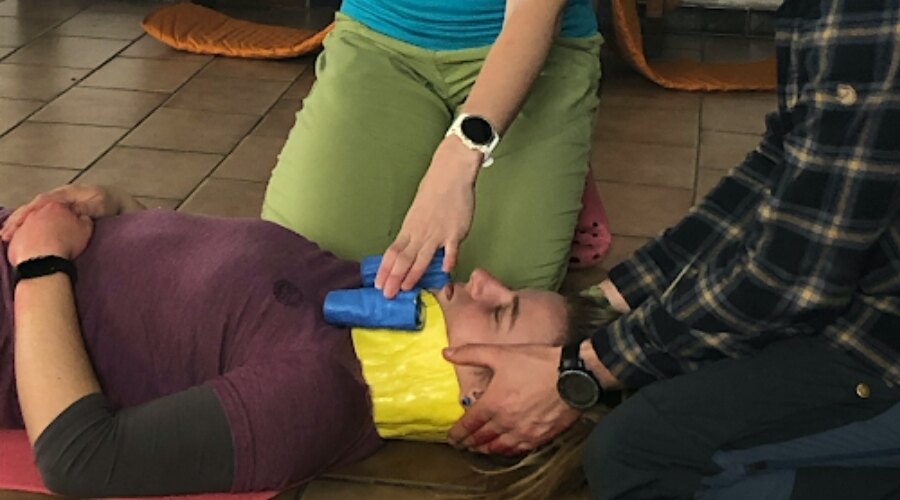
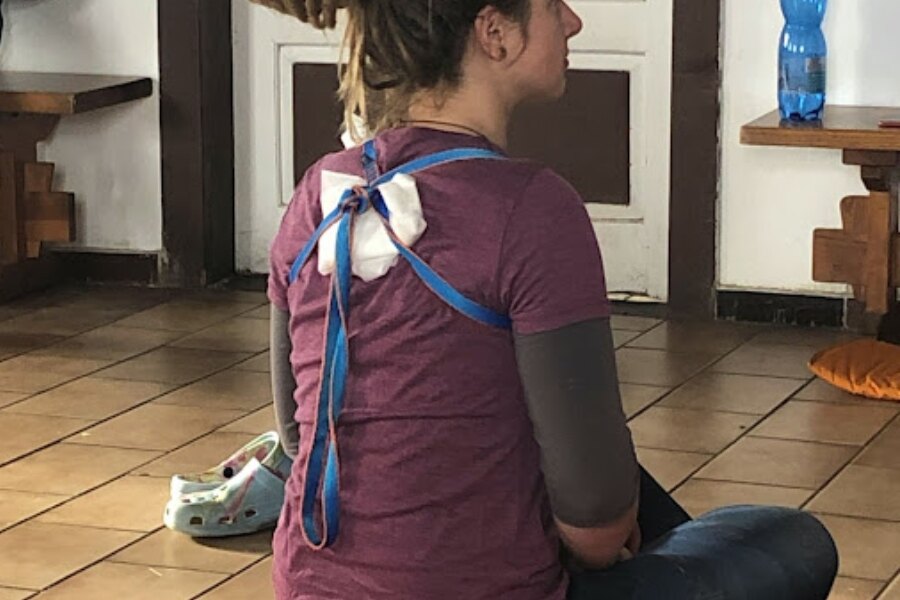
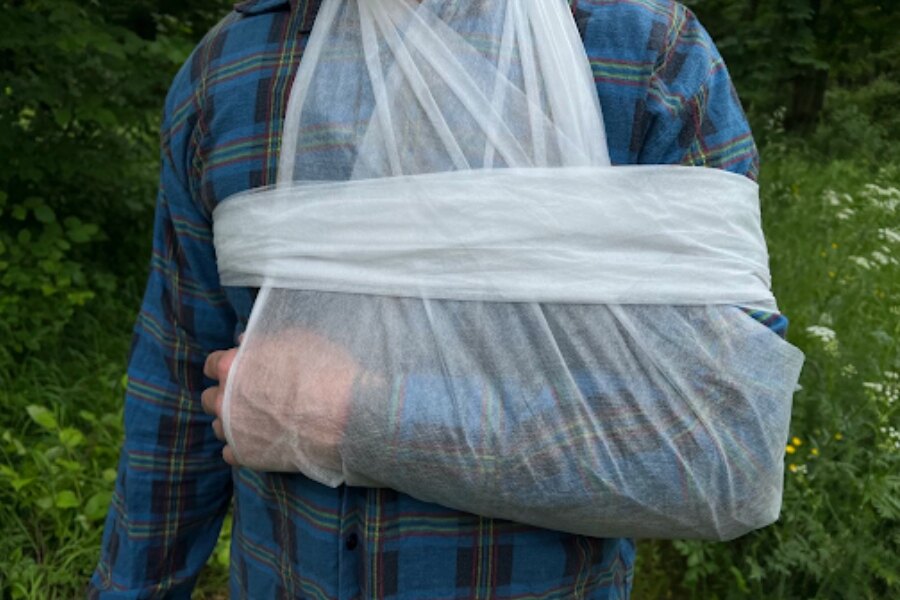
What a Proper Improvised Splint Should Look Like
Creating a splint that allows you to transport the injured person to safety is no small feat. For the splint to work effectively, it must meet several important criteria:
🛟 What an Improvised Splint Must Provide
- Stability – it must prevent movement of the injured limb.
- Comfort – the injured person may need to wear it for an extended period during transport.
- Finger/toe access – fingers or toes must always remain visible and easy to access for checking circulation and sensation (before splinting, after, and regularly).
- For joint injuries: immobilize the joint and the bones above and below it.
- For bone fractures: immobilize the bone and the joints above and below it.

SAM Splint – a moldable foam splint used in first aid to immobilize injured limbs. Easy to pack into a backpack and quickly shaped to fit the situation in the field.
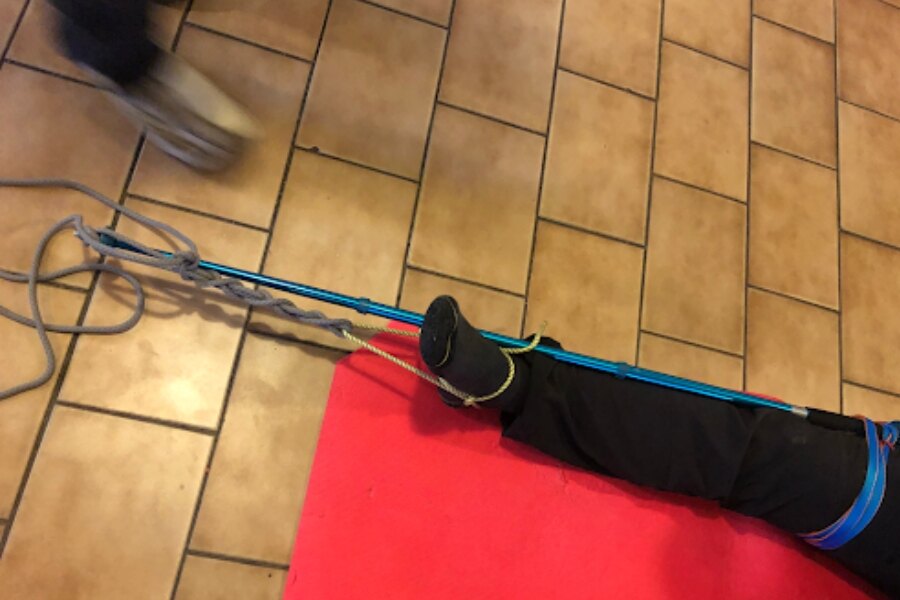
What to Use for a Splint: Supplies on Hand and Resources Around You
You can use items from a first aid kit – such as a SAM splint or a triangular bandage – or improvise with materials and gear you have with you or can find nearby.
🟠 Items That Can Be Used for an Improvised Splint:
✅ Sleeping pad (even inflatable)
✅ Trekking poles
✅ Emergency (isothermal) blanket
✅ Detachable hip belt from a backpack (for pelvic fractures – handle the injured person with extreme care and only if absolutely necessary!)
✅ Branches
✅ Flat slings
✅ Bandages, cloth (even clothing or torn fabric)
✅ Athletic tape
✅ For reinforcement: duct tape, paracord...
…and more.
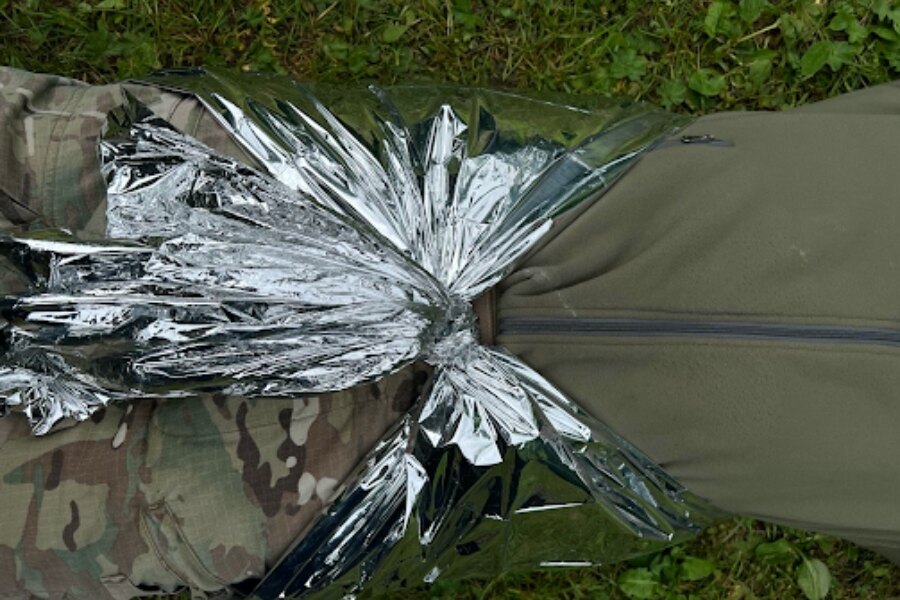
🌡️ Using an Emergency Blanket in the Field
An emergency blanket is useful not only for preventing hypothermia, but also for improvised limb immobilization—and that’s not all! Discover 10 ways to use it you might not know about.
🏕️ What to Watch Out for When Splinting in the Field
- ✅ Try to use the injured person’s own gear whenever possible. After handing them over to rescue services, you might not get your equipment back.
- ✅ The splint must hold up for the entire duration of the transport—often for an extended time—so take the time to build it carefully and securely.
After Applying the Splint: What to Monitor and Check
You've built a great splint? Excellent! But your job isn’t done yet. Even with the splint in place and during transport, make sure to:
🟡 Monitor the injured person’s level of consciousness
🟡 Check their fingers or toes regularly
🟡 Maintain their thermal comfort
Examples of Improvised Splints
❖ SERIES: FIRST AID FOR LIMB INJURIES
Read the full series and gain confidence in how to respond to injuries in the field.
- ➤ Part 1: Limb Injuries (Part 1): Stable Injuries
- ➤ Part 2: Limb Injuries (Part 2): Unstable Injuries
- ➤ Part 3: Immobilizing an Injured Limb
You’re currently reading this article. - ➤ Part 4: Improvised Transport and Recommended Gear
(Coming soon)
Note: This article was created in collaboration with Dita Voltr Podhadska, a first aid instructor with ZDrSEM and lead instructor of the outdoor first aid course HORAL.


Readers are further interested